How To Install Lighttpd with PHP5 and MySQL support on CentOS 5
Lighttpd is an open-source web server optimized for speed-critical environments. It's standards-compliant, secure and flexible. In this tutorial I'll show you how to install Lighttpd on a CentOS 5.4 server with PHP5 support (through FastCGI) and MySQL support.
1. Installing MySQL 5 Server
To install MySQL run this command from the shell:
# yum install mysql mysql-server
Enable MySQL server on boot and start MySQL server:
# chkconfig --levels 235 mysqld on
# service mysqld start
By default, mysql has no password. To create a password for the MySQL user root run the following command:
# mysqladmin -u root password yourpassword
You should set a MySQL password for your hostname too, because otherwise anybody can access your database:
# mysqladmin -h server.example.com -u root password yourpassword
2. Installing Lighttpd
Lighttpd is not available from the official CentOS 5 repositories, but from the RPMforge repositories. We have to install the RPMforge package for RHEL 5 which works for CentOS 5.x as well:
# rpm -Uhv http://apt.sw.be/redhat/el5/en/i386/rpmforge/RPMS/rpmforge-release-0.3.6-1.el5.rf.i386.rpm
Now, we can install Lighttpd using yum:
# yum install lighttpd
Enable lighttpd to start automatically when the system reboots:
# chkconfig --levels 235 lighttpd on
Lighttpd's default document root is /srv/www/lighttpd on CentOS 5, and the configuration file is /etc/lighttpd/lighttpd.conf.
3. Installing PHP5
We can make PHP5 work in Lighttpd through FastCGI. Therefore we install the packages lighttpd-fastcgi and php-cli:
# yum install lighttpd-fastcgi php-cli
4. Configuring Lighttpd and PHP5
To enable PHP5 in Lighttpd, we have to modify the following files:
/etc/php.ini
/etc/lighttpd/lighttpd.conf.
First we open /etc/php.ini and add the line
cgi.fix_pathinfo = 1
at the end of the file:
Then we open /etc/lighttpd/lighttpd.conf and uncomment "mod_fastcgi", in the server.modules:
# vi /etc/lighttpd/lighttpd.conf
[...]
server.modules = (
# "mod_rewrite",
# "mod_redirect",
# "mod_alias",
"mod_access",
# "mod_cml",
# "mod_trigger_b4_dl",
# "mod_auth",
# "mod_status",
# "mod_setenv",
"mod_fastcgi",
# "mod_proxy",
# "mod_simple_vhost",
# "mod_evhost",
# "mod_userdir",
# "mod_cgi",
# "mod_compress",
# "mod_ssi",
# "mod_usertrack",
# "mod_expire",
# "mod_secdownload",
# "mod_rrdtool",
"mod_accesslog" )
[...]
and then , further down the file, there is a fastcgi.server which we have to un-comment as well and make some change as follows:
[...]
#### fastcgi module
## read fastcgi.txt for more info
fastcgi.server = ( ".php" =>
( "localhost" =>
(
"socket" => "/var/run/lighttpd/php-fastcgi.socket",
"bin-path" => "/usr/bin/php-cgi"
)
)
)
[...]
Now we have to create /var/run/lighttpd directory and set the ownership and permissions:
# mkdir /var/run/lighttpd
# chown lighttpd:lighttpd /var/run/lighttpd
# chmod 755 /var/run/lighttpd
Then we start Lighttpd:
# service lighttpd start
5. Testing PHP5
The document root of the default web site is /srv/www/lighttpd. We'll now create a PHP file in that directory and call it in a browser.
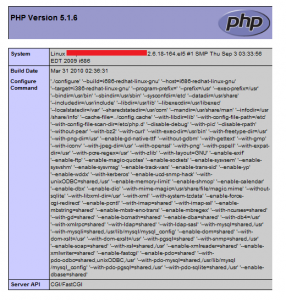
The file will display lots of useful details about our PHP installation, such as the installed PHP version.
# vi /srv/www/lighttpd/info.php
<?php phpinfo();?>
Now we open that PHP file in a browser (e.g. http://192.168.1.1/info.php):
As you see, PHP5 is working, and it's working through FastCGI, as shown in the Server API line. If you scroll further down, you will see all modules that are already enabled in PHP5.
NOTE: MySQL support is not enabled yet, we'll enable it in the next step.
6. Enabling MySQL Support In PHP5
To get MySQL support in PHP, we have to install the php-mysql package. It's a good idea to install some other PHP5 modules as well as you might need them for your applications. You can search for available PHP5 modules with the following command:
# yum search php
Pick the ones you need and install them like this:
# yum install php-mysql php-mhash php-gd php-imap php-pear php-xml php-xmlrpc
Now we have to restart Lighttpd for the last time:
# service lighttpd restart
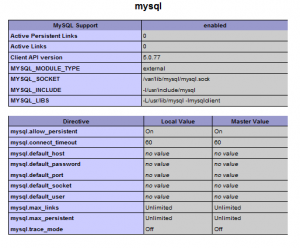
Now open http://192.168.1.1/info.php in your browser and scroll down to the modules section again. You should now find lots of new modules there, including the MySQL module:
 Print This Post

