FreeBSD: How to Install and Configure a PPTP VPN server with mpd5 on FreeBSD 8.2
The Point-to-Point Tunneling Protocol (PPTP) is a method for implementing virtual private networks. PPTP uses a control channel over TCP and a GRE tunnel operating to encapsulate PPP packets.
In this document we will see how to install and configure Mpd5 as a PPTP server, allowing remote VPN connections. This setup has been tested and works well on FreeBSD 8.2 system and Mpd version 5.5.
1. Installing Mpd5
In this document we will be installing Mpd using the FreeBSD Ports Collection. So first make sure that your ports tree is updated and then proceed with the installation.
make install clean -C /usr/ports/net/mpd5
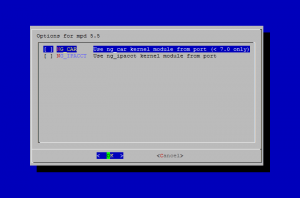
After executing the above command you will see the following screen, allowing you to select different options. You can safely leave the options as they are and continue with the installation.
Once the installation is over, you should see something similar:
===> Installing rc.d startup script(s)
===> Registering installation for mpd-5.5
===> SECURITY REPORT:
This port has installed the following files which may act as network
servers and may therefore pose a remote security risk to the system.
/usr/local/sbin/mpd5
This port has installed the following startup scripts which may cause
these network services to be started at boot time.
/usr/local/etc/rc.d/mpd5
If there are vulnerabilities in these programs there may be a security
risk to the system. FreeBSD makes no guarantee about the security of
ports included in the Ports Collection. Please type 'make deinstall'
to deinstall the port if this is a concern.
For more information, and contact details about the security
status of this software, see the following webpage:
http://www.sourceforge.net/projects/mpd
===> Cleaning for libpdel-0.5.3_4
===> Cleaning for mpd-5.5
Now that we have net/mpd5 installed, let's configure it.
2. Configuring Mpd5
In this document we will only cover how to install and configure Mpd as PPTP server. Please also have a look at the online documentation of Mpd for more information on the different options of the mpd5 daemon.
Mpd5 keeps it's configuration in /usr/local/etc/mpd5 directory. The main configuration file of Mpd5 is mpd.conf.
Here is an example configuration mpd.conf file.
In the above example configuration, you need to specify the following things:
set user <pptpadmin> admin - The administrator username for connecting to our mpd5(8) daemon.
set user <pptpadmin> <pptpadminpass> - The password for the administrator account specified in the above option
set ippool add pool1 <ip-range1> <ip-range2> - This is the IP Pool reserved for PPTP connections. When we have a new incoming connection, the client will get an IP address from the defined pool. So for example if we have set ippool add pool1 192.168.2.200 192.168.1.249, we would have a pool of 49 IP addresses for our clients
set ipcp ranges <mpd-ip-address>/<mask> ippool pool1 - Here we need to specify the IP address that our mpd5 daemon is listening on, along with the subnet mask for our network.
set ipcp dns <dns-server> - In this setting we need to specify the DNS server IP address.
set pptp self <mpd-ip-address> - Again this is the IP address that our mpd5 daemon is listening on
If you have a firewall in front of your PPTP server, also make sure that your firewall is allowing traffic for the addresses in the assigned IP Pool.
Now we can add user accounts that will be authorized to connect to our PPTP server.
User accounts are stored in the /usr/local/etc/mpd5/mpd.secret file. The file contains username-passwords pairs that are used to authorize a user, separated by a whitespace.
An example mpd.secret that contains two usernames with their passwords might look like this:
myUsername myPassword 192.168.2.11
Let's secure the mpd5 configuration, so that only root can read it:
chown -R root:wheel /usr/local/etc/mpd5
chmod -R 0600 /usr/local/etc/mpd5
3. Enabling logging through syslog
All you have to do is to add the following lines to their corresponding sections in /etc/syslogd.conf file:
!mpd
*.* /var/log/mpd5.log
Then create the /var/log/mpd5.log file and reload syslog configuration.
touch /var/log/mpd5.log
/etc/rc.d/syslogd reload
4. Allowing Mpd traffic through your firewall
If you are running mpd5(8) in a firewalled environment, you will need to pass the traffic through your firewall, so that clients can connect to your PPTP server.
pass in quick on $ext_if inet proto { tcp udp } from any to me port { 47 1723 }
pass in quick on $ext_if inet proto { tcp } from any to me port { 5005 5006 }
5. Starting Mpd5
In order to start the mpd5 daemon during boot-time, add the following lines to your /etc/rc.conf file:
# Enable mpd5 daemon
mpd_enable="YES"
mpd_flags="-b -s mpd5"
And that's it, you should now have an installed and configured PPTP server.
Now we can start our mpd5 daemon, so that our clients can connect to it.
/usr/local/etc/rc.d/mpd5 start
To control your mpd5 daemon using command-line use the following command (where of course, 1.2.3.4 is your mpd5 server address):
telnet 1.2.3.4 5005
Username: admin
Password:
Welcome!
Mpd pid 89137, version 5.5 (root@freya.b.adx.local 21:39 27-Dec-2011)
In order to view the already established PPTP connections through your browser, start up a browser to the mpd5 server on port 5006.
In order to connect to this PPTP server, you need a PPTP client (included with any modern OS).
If you are looking for a high anonymity VPN provider to allow you to surf in private and protect your online identity than you might want to take a look at SSLPrivateProxy.com.
I've been using few VPNs from them for the last month and they've been working perfectly.
Use this Coupons to get 10% discount:
SPP10FREE - for proxy services
SPP10VPN - for VPN services
 Print This Post
